June 26, 2011

Tutorial: Disable Highlight

Assalamualaikum,

I bet many of you hate it when some d*cks steal your contents without asking. With this tutorial, they can stop doing that because they can't copy sh*t from you anymore since we've disabled highlight.

1. Dashboard -> Design -> Page Element -> Add a Gadget -> HTML/JavaScript
2. Copy the code below and paste it in the HTML/JavaScript box.

<script type="text/javascript">
function disableSelection(target){
if (typeof target.onselectstart!="undefined") //IE route
target.onselectstart=function(){return false}
else if (typeof target.style.MozUserSelect!="undefined") //Firefox route
target.style.MozUserSelect="none"
else //All other route (ie: Opera)
target.onmousedown=function(){return false}
target.style.cursor = "default"
}
//Sample usages
//disableSelection(document.body) //Disable text selection on entire body
//disableSelection(document.getElementById("mydiv")) //Disable text selection on element with id="mydiv"
</script>
<script type="text/javascript">
disableSelection(document.body) //disable text selection on entire body of page
</script>

3. Click Save

Lots of love!

Credit: Unwanted

June 19, 2011

Tutorial: Tumblry Follow Dashboard Button

Assalamualaikum wbt,

Okay, I feel like doing a tutorial today. Below is the example of the follow and dashboard buttons. Just follow these simple steps and you're one step closer to have a pretty and cute blog.


1. Dashboard -> Design -> Page Elements
2. Add a Gadget -> HTML/JavaScript
3. Copy the code below and paste it in the HTML/JavaScript box.
<div style="display:scroll; position:fixed; top:5px; right:90px;"><a class="linkopacity" href="http://www.blogger.com/follow-blog.g?blogID=BLOG ID" target="_blank" rel="nofollow" title="Follow !" imageanchor="1" style="margin-left: 1em; margin-right: 1em;"><img border="0" src="http://assets.tumblr.com/images/iframe_follow_alpha.png?6" /></a> <div style="display:scroll; position:fixed; top:5px; right:2px;"><a class="linkopacity" href="http://blogger.com/home" target="_blank" rel="nofollow" title="Dashboard !" imageanchor="1" style="margin-left: 1em; margin-right: 1em;"><img border="0" src="http://assets.tumblr.com/images/iframe_dashboard_alpha.png?6" /></a></div></div>


Replace the red code with your own ID. You can find it from your dashboard.


Now click Save when you're done. I hope this will help some of you. Lots of love.

cc: Ainaa


June 14, 2011

Tutorial: Scrollbar

Assalamualaikum,

In today's tutorial, I'll be showing you how to make your scrollbar look unusually pretty. This tutorial has been requested by my fellow classmate.

1. Dashboard -> Design -> Edit HTML
2. Find this code, -> ]]></b:skin>
3. Copy the code below and paste it before the previous code.

::-webkit-scrollbar {
height:12px;
width: 12px;
background: #D9D9D9;
}
::-webkit-scrollbar-thumb {
background-color: #B2C0C6;-moz-border-radius: 10px;
border-radius: 10px;
}

Red : You can change with whatever you like. Look here.
Green : You can replace that with the code below or leave it like that and change the colour.

background-image:url(URL IMG);

4. Click Preview and if you're happy with how it looks, go on and click Save Template.

Easy breezy lemon squeezy!

cc: Nazihah


June 11, 2011

Tutorial: Sticky Post


Assalamualaikum semua,

Hari ini saya nak buat Tutorial tentang Sticky Post. Tau kan apa itu Sticky Post? Sticky post tu macam, post yang sentiasa berada di atas. Walaupun kita buat new post, post yang telah kita sticky tu tetap ada kat atas. Ada faham ka? Okay, cara nak buat dia macam ni.

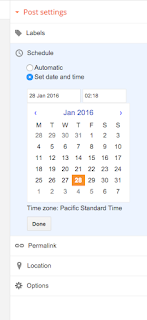
1. Go to your dashboard as in the picture below and click the Pen button.


2. Write whatever you want.


3. Then click Schedule. From here, you can select the date of how long you want it to stay.


That's that. It's really that simple. I hope you understand. Have a nice day.

June 7, 2011

Tutorial: Floating Up & Home Button

Assalamualaikum wbt,

This is my second tutorial for today. If you don't know what the Up and Home button look like, do yourself a favour and click here.

1. Dashboard -> Design -> Add a Gadget -> HTML/JavaScript
2. Copy this code and paste it in the box.

<a href='#' style='position: fixed; right: 1px; bottom: 260px;' title='back to top'><img height="21" src="https://blogger.googleusercontent.com/img/b/R29vZ2xl/AVvXsEjPAIlbQcsD7g_F1T_Jha60Yen-E5c-jax9uQuUtc4NNIeYIdDqZMVh9faW7WeVQLSracuX_KZ-FK8Vv2OiS_mweZwymR00cljgxhTTTWPGHb-2fSKNndARwmKB41Tox8sB7gvJTALsgns/s320/up.png" width="21" /></a><a href='YOUR URL' style='position: fixed; right: 1px; bottom: 287px;' title='home'><img height="21" src="https://blogger.googleusercontent.com/img/b/R29vZ2xl/AVvXsEgMjSnQFZXDJb3oApseKj4V1NVW-p2xGLEQAVsDxkbnJJeFLMApGOIqaOGON2s2yUY-Dt4upKmowNLTWpKhqPD52sPD1DSHKesBzh2LhffCUTuoptI3FJcH-jhRk_svaTJkb8fa-TZocVI/s320/home1.png" width="21" />

Green : Replace with your blog's link.

3. Click Save when you're done.

cc: WM

Tutorial: Background on Sidebar's Title

Assalamualaikum wbt,

Today is my birthday. Instead of yall giving me gifts, I'm gonna be the one to do that. I'll teach you how to put backgrounds on your sidebar's title. Here it goes.....

1. Dashboard -> Design -> Edit HTML
2. Find this code --> h2{ (use CTRL+F )
3. Now delete the codes below the previos code. Don't delete all. Make sure you know what you're deleting.
4. Now replace them with this new code.

margin:1.5em 0 .75em;
text-align: center;
font-size:95%;
line-height: 1.4em;
text-transform:uppercase;
letter-spacing:.2em;
color;#FB0123;
-moz-border-radius: 40px 10px;
border-radius: 40px 10px;
background:url('BG URL')
}

5. Red : You can change if you want to. You can find the codes here.
6. Green : Use your own background's link.
7. Click Preview to see how it looks. If you're pleased with the result, click Save Template.

I hope this will help. I don't know how else to explain. Lots of love.

June 6, 2011

Tutorial: Buat Page Dalam Facebook


Assalamualaikum semua,

Hari ni aku nak buat Tutorial lagi. Tutorial ni kawan aku request dalam Facebook. Dah lama dah dia request, baru aku perasan. Ish, teruk betul lah. Tuto ni di'request oleh Sarah.

Okay lah, jom kita start.

1. Buat page sendiri dulu. Tak tau nak buat kat mana? SINI
2. Tekan Cause or Comunity
~Dalam kotak tu tulis Tajuk page anda. Kemudian Tick I Agree. Get Started
3. Isi lah benda-benda kat dalam tu semua. Dah isi, pergi lah dekat page korang tu.Copy Link dia.
4. Pergi dekat sini pula.
5. Paste Link Page tu dalam kotak Facebook Page URL. Adjust mana yang patut.
6. Copy code iframe
7. Design --> Add a Gadget --> HTML/JavaScript
8. Copy code IFRAME tadi tu
9. Picit butang Save

Tadaaa~~~ Awak dah ada Page sendiri lah. Tahniah. Jadi ke? Kalau jadi comment tau. Kalau tak jadi, tanya. ^.^

June 3, 2011

Tutorial: Heartbeat With Own Picture

Assalamualaikum readers,

Today imma teach you how to do your own Heartbeat icon. I learnt this one from here. You can place this on the sidebar. Now let's get started.

1. Go to Heartbeat-> Log In-> My HB! Affiliate-> Get a Code-> Text Link
2. Take on of the codes. For example,

<a href="http://heartbeat.my?rid=13221" target="_blank">Make Your Own Gifts Here</a>


Replace the bolded code with the one below.

<img src="ICON LINK" />


It will look something like this.

lt;a href="http://heartbeat.my?rid=13221" target="_blank"><img src="ICON LINK" /></a>


Copy the last code and paste it on the HTML/JavaScript box. Ambik dekat Add a Gadget. Tau kan kat mana?

Green : Change it with your icon's link. If you have nothing you can borrow one of mine. Make sure to tell me first.

http://i1232.photobucket.com/albums/ff374/syazwana7/heartbeat1.png


http://i1232.photobucket.com/albums/ff374/syazwana7/heartbeat2.png


http://i1232.photobucket.com/albums/ff374/syazwana7/heartbeat3-1.png

http://i1232.photobucket.com/albums/ff374/syazwana7/heartbeat4-1.png


June 2, 2011

Tutorial: Pop Up Window


Assalamualaikum wbt,

The pop-up window is also known as the greeting card. It's when you first click one's blog, this thingy appear. If you're interested in having one, follow the steps below.

1. Dashboard -> Design -> Edit HTML

2. Search for this code <head>

3. Now copy the code below and paste it before the last code.

<script language='JavaScript'>alert(" YOUR WORDS ");</script>

Red : Replace with your greeting words.

4. When you're done, click Save Template.

cc pic: inf

Tutorial: Wishlist


Assalamualaikum sahabat,

Wishlist 1
Wishlist 2
Wishlist 3
Wishlist 4
Wishlist 5

Above is the live preview of the wish list box. It's very simple to do. Just follow the steps below.

1. Dashboard -> Design -> Page Element -> Add a Gadget -> HTML/Javascript
2. Copy and Paste this code in the HTML/Javascript box.

<form name=myform>
<input type="checkbox" name="mybox" value="Wishlist 1" checked />Wishlist 1<br />
<input type="checkbox" name="mybox" value="Wishlist 2" checked />Wishlist 2<br />
<input type="checkbox" name="mybox" value="Wishlist 3" checked />Wishlist 3<br />
<input type="checkbox" name="mybox" value="Wishlist 4" checked />Wishlist 4<br />
<input type="checkbox" name="mybox" value="Wishlist 5" disabled />Wishlist 5<br />
</form>

  • Red : Change with your own words.
  • Green : Write 'disabled' or 'checked'.
3. Click Save and you're done!

Tutorial: Facebook Like Button

Assalamualaikum wbt,

1. Dashboard ->Design -> Edit HTML-> Expand Widget Templates

2. Search for this code. 

data:post.body

3. Copy the next code and paste it below the previous one.

<iframe allowTransparency='true' expr:src='"http://www.facebook.com/plugins/like.php?href=" + data:post.url + "&amp;layout=standard&amp;show-faces=true&amp;width=530&amp;height=60&amp;action=like&amp;colorscheme=light"' frameborder='0' scrolling='no' style='border:none; overflow:hidden; width:530px; height:60px'/>

4. Click Preview in case it's not working. Then Save Template when you're happy with the result.


Tutorial: Change Highlight Colour

Assalamualaikum,

If you want to change your highlight colour instead of the boring blue you can try this tutorial. I learnt this one from Anis Diyana.

1. Log In-> Dashboard -> Design -> Edit HTML
2. Find this code -> a:link {
3. Copy the code below and paste it above a:link{ .
 
::selection {
background: #ffffff; /* Safari */
color: #000000;
}
::-moz-selection {
background: #ffffff; /* Firefox */
color: #000000;
}

 
Change the red codes of your desire. You can look it up from here.

4. Click Preview as a cautious step and Save Template when you're happy with the result.
 

Tutorial: Doubled Underline

Assalamualaikum w.b.t,

Without further a due, let's get started since I'm rushing right now.


1. Dashboard -> Design -> Edit HTML -> Tick Expand Widget

2. Ctrl+F the code /* Header
 
3. Copy the code below and paste it above the previous code.
u {
text-decoration:underline;
border-bottom: 2px double #F52887;
padding: 0px;
}

  • Red : Change it with how thick you want the line to be.
  • Green : You can replace with DOTTED, NONE, SOLID or DASHED.
  • Purple : That's the colour code. Can look it up from here.
When done, you can Save it. That's it. You're finish.


Tutorial: Energy Saving Mode

Assalamualaikum w.b.t,


1.Dashboard -> Design -> Edit HTML

2.Find this code - </head> (guna CTRL+F)

3. Now copy and paste this code above the previous code.
<script language="javascript" type="text/javascript" src="http://www.onlineleaf.com/savetheenvironment.js"></script>

4. Click Save Template.

You're done!